
I have been reading up on the
Husqvarna Svartpilen 401 which weighs in wet at
around
160Kg. I doubt very much that I would be taking it out on extreme tracks
(like in the video below) but for those rough B roads of the Lothians and
Borders of Scotland and for some green lanes up on the hills, it could prove an
excellent choice. Most of the reviews are very positive, especially the latest
reviews with the 2023 model, which has wire spoke wheels.
The bike has a single cylinder liquid cooled 4 stroke 373cc engine,
44hp, 37Nm torque, quick shifter, 6 speed gearbox, two channel ABS
brakes, 145mmm ground clearance, 835mm seat height, 9.51 litre petrol
tank, 17" wheels and 142mm front and rear suspension travel. There is no
traction control and more technical details can be found on the website.
Accessories
There are a number of accessory options on the
Husqvarna Svartpilen 401
website and also
crash protection and other options on the
R&G Racing website.
I sat on the
Husqvarna Svartpilen 401
the other day in a showroom and I found the seat very comfortable and coupled
with a seat height of
835mm,
I could sit flat footed (32"
inside leg) on the floor.
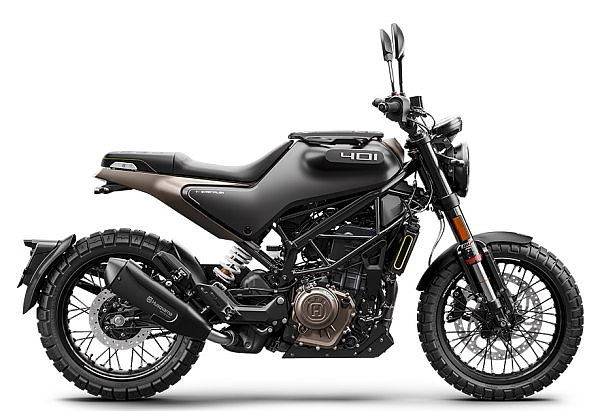
Husqvarna Svartpilen 401 (with wire spoke wheels)
No Traction Control - Winter and Wet Weather Use
The
Husqvarna Svartpilen 401
is a motorbike that I could use in the winter
months and on wet days. All it requires is
Oxford Heated Grips
and
some
preparation with
ACF-50
protection spray.
Scotland is notorious for wet weather and the month of July (2023) has
experienced rain most days. Unfortunately it does not have
traction control but I have ridden a Suzuki GSX-1250FA (Bandit) Sport/Tourer
for 9 years, without traction control in wet weather so the Svartpilen
401,
which has less power, should be okay.
Inner Tube Dilemma
For many bikers out on a countryside ramble on their Husqvarna
Svartpilen 401, the thought of an inner tube puncture inside a tyre and the
additional thought of
removing a wheel, tyre and inner tube to repair the puncture, especially
one on a
back wheel,
is problematic.
Also consider the tools they would have to carry to remove a wheel,
especially a torque wrench to refit it. However, with great care, it is possible to fix a puncture without
removing a wheel, especially if you can see a nail sticking in the tyre.
A tyre sidewall which is slashed open, effectively makes a repair
impossible as the tyre itself is unsafe to ride on.
Repairing an Inner Tube Puncture
Repairing an inner tube puncture without completely removing a
fully deflated inner tube from it's tyre or removing a wheel should not prove that difficult.
More on the subject of
Repairing an Inner Tube at the
foot of this article.
Video Reviews -
Inner Tube Punctures -
Repair Kits
With regards to inner tube tyres, a couple of
Motul Tyre Sealant
puncture repair kits
(for larger wheels) can temporarily seal an inner tube providing the puncture is not
too severe - see how in the
Technical Support Sheet. This is a
temporary repair to get you to a garage or home for a permanent repair.
For a permanent repair of the inner tube, you will require a Husqvarna Tyre Lever Set, an
Inner Tube Repair Kit from Halfords and a
Bike It CO2 Cartridge Kit with a few
Bike It Extra CO2 Cartridges, to re-inflate the tube
(perhaps a few times during the repair process). To
make life easier, a
Bike IT 90 Degree Valve Extender is a handy
accessory. If I purchased the bike, I would carry all of the
above, including the two Motul Tyre Sealants in a pannier bag.
Inner Tube Puncture Repair - Without Removing a Wheel and Without
Removing the Entire Tube
If you know exactly where the puncture is (say a nail sticking in
the tyre) turn the wheel (tyre puncture area) to where there is easier access. You can break one
side of the tyre beading with your hands or a tyre lever and remove the side of
the tyre from the wheel rim (without removing the wheel) then remove the nail
from the tyre, and gently pull out the fully deflated tube (only the section
where it is punctured) and apply the repair patch before carefully pushing the
the tube section back in and carefully push the tyre back on and finishing the
closure using the tyre levers.
Great care has to be taken in opening (or closing) one side of the tyre
and removing/replacing an inner tube as using the tyre levers the wrong way can
actually create another puncture by pinching the tube against the tyre rim or
the wheel rim. When refitting a section or an entire tube, you must ensure it is not twisted. Very often, after the tube is in place, a
partial inflation will assist in properly seating the tube before closing the
tyre.