|
Sony
SLT A57 Camera (My Main Controls
+ Menu Settings) |
Last Updated
-
4th August 2012
For 'STILLS' photography, I am using the camera in
Aperture Priority Mode -
A
on the top MODE Dial and for Video, I have the Video Dedicated Mode on
the
top MODE Dial set-up
to Aperture Priority. Using this method, I can very easily switch
between STILLS and VIDEO.
There is a separate
VIDEO SECTION which is at the
bottom of this page.
Aperture Priority Mode - Stills Photography Set-up for Jpeg+RAW Image Files
My
Menu Settings + Controls
-
I really like the Sony SLT A57's camera's main menu set-up, it may be extensive but it is not
difficult to follow, especially as it has the help
?
button on the rear of the camera. In the menu, you just place the highlight
banner over the menu setting to be changed/considered and then press the
?
button and all is explained in a new screen - press it again to toggle
back to the menu setting to make your choice.
Please bear in mind that all my settings are relative to the camera
being used in Aperture Priority A mode and for shooting Jpeg +
RAW image files. This does impact on certain functions that a user
may wish to use if they were shooting only Jpeg image files -
If you wish to commence exploring these areas - please read the
Sony SLT A57 Camera Manual
(Window)
The camera is made up of 3 Control
Areas -
-
The MAIN MENU which you enter
by pressing the MENU button and where you set-up your (hope I
don't come here again) main settings
-
The physical buttons and rear
tilt/switch wheel on the body, which offer up your main everyday controls
and especially the ISO button on the top of the camera which brings
up a menu for ISO rating choice and the DRIVE
tilt/switch on the rear
control (left of the 4 cluster tilt/switches) pad, which brings up a
menu (7 areas - like timer, bracketing), it also repeats the main
drive (single/burst shots) choice found using the Fn button/menu (see below).
-
The Fn button/menu on the
rear of the camera that brings up a menu (14 areas - like drive, exposure
metering/autofocus)
that you may wish to change depending on the nature of the scene. This is
very easy to use.
My Camera Menu is Programmed for the A - Aperture Control Mode (only that
mode)
I always shoot 'RAW' files in A aperture priority mode and for this
diary, I will be shooting jpeg files as well, straight from the camera. I have
always preferred to set-up my aperture to suit my take on a scene for effect
(bokeh etc) and choosing to adjust the optimum shutter speed through
changing the ISO rating to suit (if required). I have set-up my menu and
stripped away a great deal of the stuff that I will never use (like face
recognition) but for anyone starting out in photography and moving up from a
point and shoot compact camera, I would advise a gradual modification of the
menu structure (to suit your developing skills) rather than taking a
larger step. The main menu in any case, does have a default reset.
There has to be compromises in manual control with any camera which is aimed at
the consumer marketplace. The Sony A57 camera is decked out with controls and
technology that only a few years ago, you would only find in a more expensive
camera. However, there has to be some downsides and thankfully the controls
which are affected are not that critical to my style of shooting.
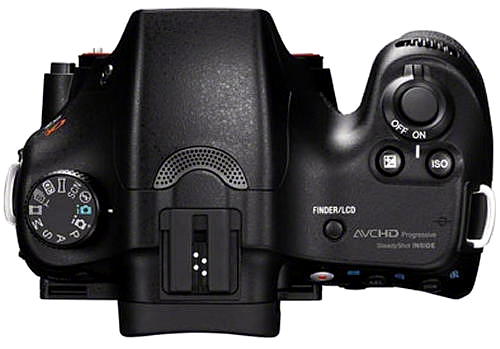
To assist in
understanding where the main control buttons are - see the
Sony SLT A57 Camera Body - Pictures
which opens up in a separate window.
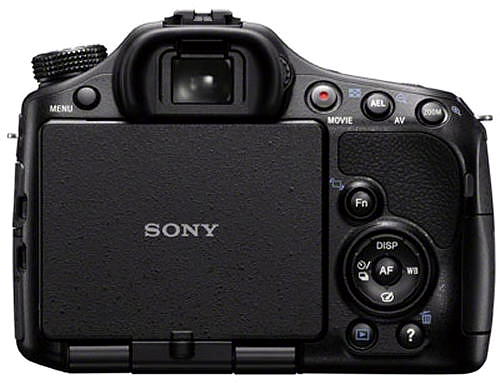
My Main Controls
Brief Summary -
-
Aperture Priority -
Top large control dial - set to A for
aperture priority
-
WB Button (right of rear large dial set control pad) -
set to AWB
-
Exposure Metering - Fn Button on rear of camera
calls up a Fn
menu - set
to multi segment exposure metering
-
Autofocus Single Shot - Fn Button on rear of camera
calls up a Fn menu - set to
AF-S autofocus single
shot
-
Centre Spot Focus - Fn Button on rear of camera
calls up a Fn menu - set to centre spot focus
-
Single Shot -
Shutter Mode Button (left of rear set control
pad) - I prefer the shutter set-up for single shot (also can be
set-up for burst shots, image bracketing, white balance bracketing,
self timer and remote device) The Fn button function can also
be used for the shutter mode settings. -
Aperture Setting Control - Front of camera recessed
knurled wheel in front of shutter button - For setting up the
aperture f# stop -
ISO
Button (top of camera behind shutter button) -
calls a menu - I changed AUTO to 100 (ready for changing to suit) -
Exposure Compensation Button on top of camera
behind power switch - calls a menu - set to 0
-
AEL (Exposure Lock) Button - set to 'toggle' auto
exposure lock on and off when pressed
-
Preview
Button on the front/base of camera - configured in the main MENU for Focus Magnifier - ideal for shooting subjects with the camera on a
tripod using the LCD screen, set the exposure and lock using the AEL
exposure lock button, lens switched to manual, press the preview
button to zoom into subject, press again for further zoom and adjust
subject area by using the rear AF dial top/bottom/right/left paddles
and adjust the focus using the lens focus ring - finally press
shutter button to take the shot. (to return to normal view at
anytime during focusing - press the AF button)
-
Locking Focus -
Half press of shutter holds focus
point locked until pressed full down or released
-
Object Tracking -
AF button (centre of rear large
dial set control pad) - tracking of a moving subject
-
PLAYBACK blue arrow button on the rear/bottom right
of the camera - for previewing captured images
The above Main Controls are now explained in greater detail - (with an
abbreviated listing after this section)
A
(Aperture Priority) Top Control Dial (large round wheel on top of camera)
I use the A setting which sets up the camera to allow me to set the
aperture of the lens. I set the aperture (using the front control wheel) and
the camera takes an exposure reading of the scene and automatically sets
the shutter speed for me. I can increase the shutter speed by
raising the ISO rating (e.g. 200 to 400) or lower the
shutter speed by decreasing the ISO rating
(e.g. 400 to 200) but the higher the ISO rating
the more noise (speckle) will start to appear in the final captured
image.
White Balance ((rear dial, right tilt/switch)
Because I normally shoot 'RAW' image files, I never adjust the white balance - If I have
to make any changes, due to different lightening set-up (e.g. florescent
lights, etc) I make them during post processing in software. Any RAW images
I capture are therefore captured using the auto white balance setting. However
jpeg users may wish to use this WB button to change the scene colouring to suit the environment
they are shooting in, which is reflected in the viewfinder and the LCD screen.
If you are shooting jpegs only, you have to make sure this WB setting is correct
for the scene lighting, personally I have played safe and just left it at AUTO.
Warning AWB
- If you are
shooting only camera jpeg images and rely on the AWB (auto white balance)
setting to make colour decisions for you, be careful that you do not change the
AWB colour grid 'defaults' whilst shooting. If your camera menu is setup to
return to the last place you selected it is possible to accidentally call that
up again and change it without realising. For instance, if
the WB button/menu is left 'highlighting AWB' and later (whilst using the
viewfinder) your right thumb wanders on the back of the camera whilst
searching for a button or strays from the finger rest pad and puts pressure on
the right tilt WB button a couple of times, you will bring up the AWB color
filter grid, effectively changing the AWB 'default' colour setting on the grid
to the right, towards red. This is possible whilst taking a picture and as
the eye detects the change away from the scene in the viewfinder to the menu,
the reaction is often (without thinking)
to half press the shutter button to return the viewfinder to viewing the scene
to be shot. However by half pressing the shutter button the camera has now
accepted the new AWB colour grid setting and (in aperture priority mode)
it will remain changed until you reset it. This is an area that I will now check
from time to time to ensure that the AWB colour grid co-ordinates are set to
zero and the spot is in the centre of the colour grid crosshairs
Exposure Metering - Fn Button then Menu Change (button on camera
back)
Virtually all my photography is shot in exposure multi segment metering
mode, so it is easy to set this up by pressing the Fn button on the rear
of the camera, which raises a menu with 14 sections and
using the left/right/top/bottom tilt switches on the rear
dial on the back of the camera, I can
scroll to the metering mode icon on the right, near the top, of the menu
screen and highlight it, press the AF button in the centre of the rear
dial, scroll to my metering choice, highlight it and press Fn to accept
and come back to the main Fn menu, press Fn button again to leave
the menu completely. The setting choices are multi segment, centre weighed and
spot metering. It may appear quite a trip but once you get the hang of the Fn
and menu, it is simple to operate. If metering is all that you use the Fn
button for - then by leaving the metering mode icon highlighted, it will always
return there when you enter the menu.
Autofocus Mode -
Fn Button then Menu Change (button on camera back)
Virtually all my photography (with the Sony A57 to date) is shot
in AF-S mode, autofocus single shot, so it is easy to set this up by pressing the
Fn button on the rear of the camera, which raises a menu with 14 sections
and
using the left/right/top/bottom tilt switches on the rear
dial on the back of the camera, I can
scroll to the autofocus mode icon on the left, near the middle, of the
menu screen and highlight it, press the AF button in the centre of the
rear dial, scroll to my AF-S choice, highlight it and press Fn to accept
and come back to the main Fn menu, press Fn button again to leave
the menu completely. The setting choices are AF-S single-shot, AF-A still/moving
subject and AF-C continuous focusing on a moving subject as long as the shutter
button is half pressed.
Autofocus Area -
Fn Button then Menu Change (button on camera back)
Virtually all my photography is shot in centre spot autofocus area, so
it is easy to set this up by pressing the Fn button on the rear of the
camera, which raises a menu with 14 sections and
using the left/right/top/bottom tilt switches on the rear
dial on the back of the camera, I can
scroll to the autofocus area icon on the left, near the middle, of the
menu screen and highlight it, press the AF button in the centre of the
rear dial, scroll to my centre spot AF choice, highlight it and press Fn
to accept and come back to the main Fn menu, press Fn button again
to leave the menu completely. The setting choices are wide, zone, spot and
local.
Shutter Drive Mode - Single Shot
- Burst Shots - Timer - All Bracketing (rear dial, left tilt/switch)
I use this mainly for single shot or burst mode shutter settings, you press
the drive tilt/switch on the left of the rear large control pad, enter the menu, use
left/right/top/bottom tilt switches on the same pad, scroll to the top square
for single shot or down one to the burst mode icon, press the AF button in the
centre of the dial to select and then the menu closes automatically. You can
also use this operation to change the self timer, the exposure single
shot/multi-shot bracketing, white balance bracketing and switch to a remote
shutter device.
The Fn
button on the rear of the camera also has the drive mode in it's menu
selections.
Aperture Control - Front
Control Wheel
(semi recessed large ridged wheel on front of camera)
After I have set A - I can then rotate the control wheel which allows me
to set the aperture of my choice - f3.5 for the Sony 18-55mm zoom
lens at 18mm
which
produces a 'narrow area in focus' depth of field and to f22 for a
stopped down (less light is allowed in) which produces a 'larger area in
focus' depth of field. As the zoom lens at 18mm (27mm field of view)
moves towards 28mm, 35mm to finally 55mm the f3.5 automatically stops down
to f5.6 as the widest (possible) aperture open setting of the lens at 55mm (82.5mm
field of view) to the fully stopped down f36.
ISO Button - Button on Top (button positioned behind the power
on/off switch)
This is similar to the old film days where you select the ISO for the
speed of the film - ISO:100 for slower film to ISO:800+ for faster film.
In the film days the slower the film the less the grain on the image and
the image quality was optimum. The faster the film the more grain and
the image quality was not as good. Faster film tended to be used for low
light shots and faster moving subjects. It is the same today with the
modern digital sensor but grain or digital speckle is now known as 'noise'. The ISO setting
of my choice, using the ISO button and menu, plays an important part as
ISO:100 will match a slower shutter to my choice of aperture whilst
ISO:800 will select a much faster shutter speed.
Exposure Compensation -
+/- Button (button
on top of camera behind the power on/off switch)
Once I have set-up my aperture setting (then perhaps ISO/shutter
adjustment) I might find that my scene in the viewfinder or LCD
screen is too bright in the sky or perhaps too dark in the foreground.
The +/- button when pressed
will bring up a (-.....0.....+) dotted line and using the left/right tilt
switches on the rear control pad on the back of the camera, I can
alter the cameras exposure metering by increasing the exposure + or
decreasing - it. I invariably never use this unless I am using a
tripod and have plenty of time to take the shot - I normally use the AEL button
- see below.
AEL Button
(button near the top right of the camera back)
I have this button
programmed to 'lock the exposure'. After I have set-up
the camera for the shot, I may find that the scene requires less or more
exposure and I may want to lock that exposure so that I can focus on a
part of the scene only. I have two choices, I can use the +/- exposure
compensation button
and adjust the metering (using tilt switches on rear control pad) and then press the AEL button
(star icon appears in the viewfinder)
to lock the
exposure (press again unlocks it) or I can just raise/lower the camera and lock an exposure as the
metering of the camera automatically changes as it sees more light or
less light. This then allows me to focus on my given subject and even
re-arrange my scene in the viewfinder or LCD screen - see the Shutter Button part
below.
Preview Button - Focus Magnifier (on the front/base of camera)
Configured in the MAIN MENU for Focus Magnifier - ideal
for shooting subjects with the camera on a tripod and using the LCD
screen, set the exposure and lock using the AEL exposure lock
button
(star icon appears in the viewfinder)
then switch the lens barrel from AF to MF (manual focus) press the preview button to zoom into
the subject, press again for further zoom and adjust subject area by using
the rear AF control pad top/bottom/right/left paddles and adjust the
focus using the lens focus ring - finally press shutter button to take
the shot. (to return to normal view at anytime during focusing - press
the AF button)
NOTE: I also have my menu set-up for FOCUS PEAKING in
manual focus mode and when manually focusing (using the lens focus
ring and focus magnifier) the area in focus is outlined with a sugar
white frosting.
Shutter (Half Press AF Focus) Button
(camera top at the front right)
Using the shutter
button, I can half press it to autofocus on the part of the scene that I
want in focus (using the centre spot) and by still holding the half
press, I can re-arrange my scene in the viewfinder or LCD screen and then fully
press down the button to take the shot. This is ideal for 'isolating the
focus' of subjects in an overall scene.
Object Tracking - AF Button (middle of large dial on rear of
camera back)
Used for tracking a subject which is moving within the viewing frame.
View the scene and press the AF button in the middle of the rear control
pad
and a white rectangle appears in the middle of the scene. Line this
white rectangle up on the subject and press the AF button again - the
rectangle now has a double white outline and begins tracking the moving
subject which must remain in view within the frame - press the shutter
button to take the shot
or press AF again to cancel the operation.
Image Inspection
on Playback - Full Preview Display with Histogram, Data and Highlight Blink Mode
I have my initial capture 'delay' viewing time set
to 5 seconds - which applies to the viewfinder and the LCD screen. It is
set for a full image display and minimum data. In
the case where I want to properly preview an image for more than 5 seconds
(right after the shot is taken) then I will press the PLAYBACK blue
arrow button on the rear/bottom right of the camera, flip down the LCD screen
(the image auto-rotates the right way up) press the DISP
tilt/switch on the rear control pad and toggle it to select one of my displays to suit the preview
- I prefer the full preview display which includes, highlight
warnings, histogram and full image capture settings. After I am finished, I then
toggle back to the 'basic minimum display' before pushing up and back
the LCD screen into the body. NOTE: If I forget to return to the
'basic minimum display' then the next time I take a shot the 5 second
preview display in the viewfinder (or LCD screen) will be the
full preview display with a small windowed image, full histogram,
highlight warnings and full data information, which although very
informative, does not let me see 'clearly' the entire composition of the
image. I would have preferred a large image in playback with highlight warning -
blinking white/black.
Main Menu Settings - These are the Changes made to Default
Camera Settings
-
Image Quality - RAW + Jpeg
-
Wind Noise Reduction - On
-
Red Eye Reduction - On
-
Grid Line - Rule of 3rds Grid Line
-
Peaking Level - HIGH (used in manual focus mode to highlight areas in focus)
Peaking Color - WHITE (combined with Peaking Level
it highlights
in white the areas in manual focus)
Auto Review - 5 seconds
Display Button - All Displays Selected
AEL Button - Toggle the Hold ON/OFF
Preview Button - Focus Magnifier
Lens Compensation for Distortion - AUTO
Lens Chromatic Aberrations - AUTO
Power Save - 5 Minutes
Face Priority Tracking - Off
Menu Start - Previous (always returns the menu to where you last left it)
Mode Dial Help Guide - Off (leave on if you wish to use the Help Guide)
Front Shutter Curtain - Off
Fn Button/Menu Settings
-
Drive
Mode -
Single Shooting
-
Flash
Mode - Fill Flash
-
Autofocus Mode - AF-S (Single Shot AF)
-
Autofocus Area - Centre
Spot Autofocus
-
Object Tracking - ON
-
Smile
Face Detect-OFF
Auto Port Framing - (Grayed out when using
Jpeg + RAW Mode)
ISO -
100
Metering Mode - Multi-Segment
White
Balance - Auto
Flash Comp - 0
White
Balance
- Auto
DRO/Auto
HDR - DRO Auto (Camera will compensate between
dark and light area for optimum image)
Creative Style - VIVID (contrast
+1, saturation + 1, sharpness +2)
Picture Effect -
(Grayed out when using Jpeg + RAW Mode)
Aperture Priority Menu Setting - Jpeg + RAW Image Files - NOTES:
-
Camera Front Curtain Setting - MENU -
I have set the Shutter Front Curtain to Off - When it is set to ON it is quieter
and reduces the time lag between shots. However, the manual warns that when using a
large diameter lens with the camera you may experience ghosting or blurred
sections on the captured image. If this occurs Sony recommend that the setting
be changed in the menu to OFF. For my tests, I have decided to switch it off.
-
Noise Reduction + Creative Mode (only for camera jpeg image files -
works with RAW+Jpeg)
I have the High ISO Noise Reduction in the MENU set to Normal and in the
Fn menu, I have scrolled to the Creative Mode and set it to VIVID with
the contrast set to +1, saturation +1 and sharpness +2. In this way, because I am
shooting RAW + Jpeg image files, I am seeking the optimum settings for my camera
jpegs, knowing that I can alter my 'RAW' file settings in the Sony Image Data Converter Software. It is the best of both worlds, because you can
use the jpegs but for anything special, you can work on the 'RAW' version.
Editing modes in Fn Creative Mode is great because it provides you with a small
window screen of the image in front of the lens (remove the lens cap and
focus first before you enter the Fn menu) and as you edit, the window screen
changes to match your adjustments. To much contrast and saturation will
reduce the quality of the finer points (like small leaves) in any
image. There is a fine balance between image resolution (especially for
subjects at distances further away from the camera) and vivid colour
displays - everyone's tastes are different.
-
The
Fn button/menu also includes in the creative style option (bottom
right of menu) where instead of the VIVID setting you can select the
style of image (Standard, Portrait, Landscape, Black and White etc) and also
adjust the contrast, saturation and sharpness.
Video Settings
Normal Video Recording (Automatic)
For normal video shooting, I just press the
RED (video)
button whilst I am in my normal 'stills' photography mode A - Aperture
Priority and the camera handles the autofocus, shutter and aperture settings for
me.
Dedicated Video Modes (1 Auto + 3 Manual)
For manual focusing and more control of the aperture, shutter and the lens, I
switch the top main control wheel to the VIDEO ICON (dedicated video mode)
and use the Aperture Priority Program -
The dedicated video control is chosen by selecting the video icon on the
main top control wheel on the left. This brings up 4 settings
(Auto/Aperture Priority/Shutter Priority/Manual Exposure) and you
can select your chosen setting by scrolling down using the rear
tilt/switches on the rear control pad and pressing the AF
button. When you finish in dedicated video mode the setting is maintained until
you again change it -
Once the top control wheel is set to dedicated video mode - you can
re-enter the menu at any time by using the Fn button and scrolling
(tilt/switches on rear control pad) on to the top left MOVIE
selection area and use the AF button
(on rear control pad)
to enter/select/exit.
Camera MAIN MENU Settings for Video
In the camera's MAIN MENU I set-up my choice of video file parameters
for both automatic and manual modes to the same settings
by pressing the MENU button and
using the
tilt/switches on rear control pad
to scroll and the
AF button (on rear control pad)
to enter/select/exit
-
Video Mode - Further Settings Adjustment
In video mode - the following settings that were used during 'stills' shooting can
still be
adjusted -
If you have enjoyed this article - please donate to my
Charity of Choice - The Sick Kids
Richard Lawrence
Scotland
United Kingdom
|